Hosting on Digital Ocean: Docker, Nginx, Reverse Proxy, and Let's Encrypt
A step-by-step guide to deploying a React + Django application on Digital Ocean using Docker Compose, Nginx as a reverse proxy, and free SSL certificates via Let's Encrypt.
21 June 2026
I will share with you how I deployed an application on Digital Ocean and used Let’s Encrypt to secure it so it is accessible over HTTPS. The application is a buy-and-sell vehicle advertising website targeting the Swedish automobile industry. It is accessible at www.listcar.se. I hope that via the steps described here, you can set up any application using the following technological tools: docker, nginx, and let’s encrypt.
Many of you will agree that deploying a website online can sometimes be tedious. That approach of doing many things simultaneously only works when I have a bunch of technology I am learning. I follow this convention: the less I know, the simpler I approach it. I will set up elementary and easy-to-follow steps to grasp the technology. Throughout this tutorial, you will see what I mean.
Below are the steps to follow to reach the final goal.
Create the web index.html page
Serve Web from Nginx Docker container
Set up docker-compose.yml
Create the back-end index.html page
Set up the reverse proxy
Hosting on DigitalOcean
Let’s encrypt the application
Create the web index.html
Start with creating an index.html file with the content below:
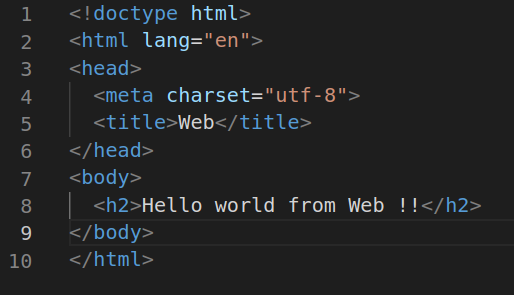
The page is static; you can right-click and view it on a browser such as Chrome.
OBS: For listcar, there are two applications: Javascript React for the front-end and Python and Django for the backend side.
Serve Web from Nginx Docker container
The pre-requisites knowledge for this step are:
Docker
Basic knowledge of Nginx
Create a file, name it nginx.conf, and paste the following content into the file:
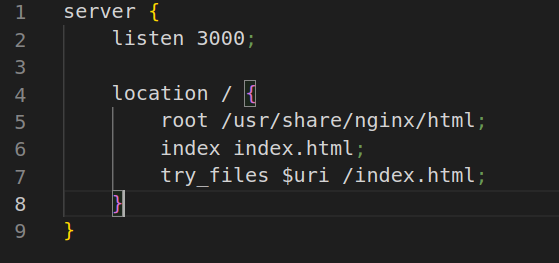
The above script will tell nginx to listen to port 3000, and to serve any request with the index.html.
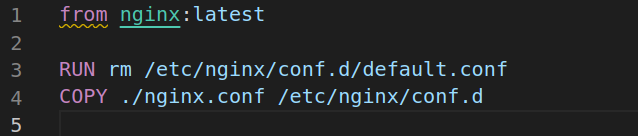
Create a file, Dockerfile, with the content:
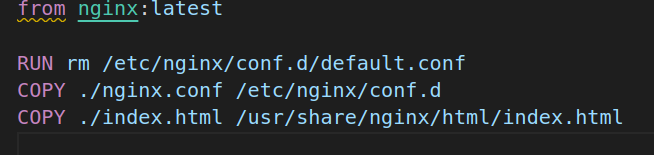
The docker file contains command that tells Docker to run the container with the latest image of nginx, and to remove the default conf. To Copy the web index.html (in the current directory of the machine) and the current nginx.conf to the folder conf.d.
Run the following command:
docker build . -t web && docker run -p 3000:3000 web
Create a folder, name it web, and move the content inside the web folder.
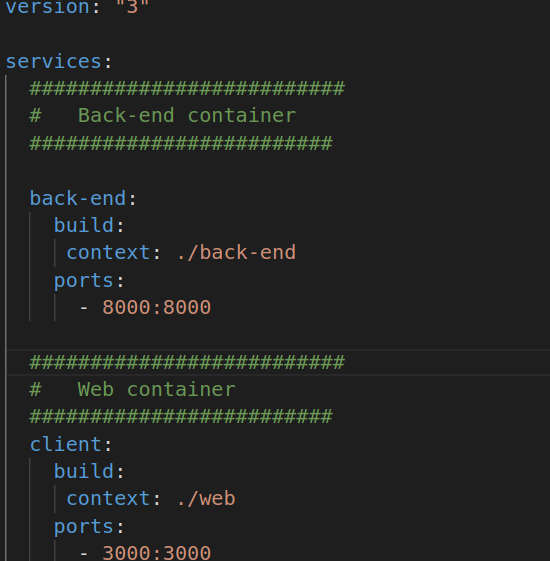
Set up docker-compose.yml
The purpose of docker-compose is to have multiple applications running in their containers and a way to orchestrate them.
Paste the following in the docker-compose.yml:
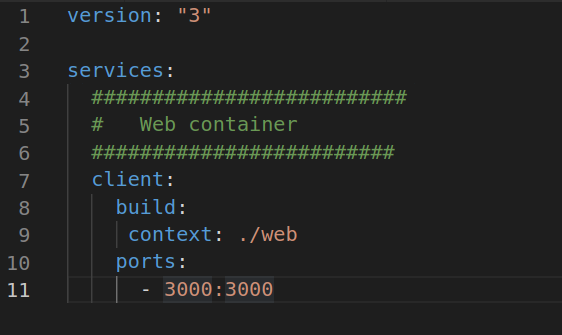
Docker will set up the web container and allow the outside world to communicate via port 3000.
Run the following command:
docker-compose up -d
Then, navigate to localhost:3000. You should see the same result as in the previous step.
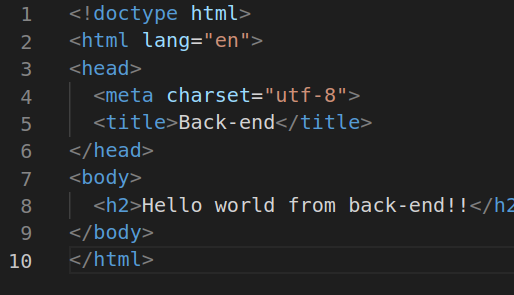
Create the back-end index.html
With the knowledge of the first two steps, do the same for the back-end.
Copy the web folder and rename it back-end. Paste the following into the index.htlm:
Add a new entry to the docker-compose.yml and paste the following:
Run the following command:
docker-compose build && docker-compose up -d
Both web and back-end are accessible on localhost:3000 and localhost:8000, respectively.
Set up the reverse proxy
The reverse proxy server is the one that will be directing requests to the web or the back-end, depending on the path.
Create the reverse proxy folder and call it a proxy. In the folder, add the following files:
Dockerfile
nginx.conf
The Dockerfile will be no different from the web Dockerfile. All that remains is to override the other conf file.
And the nginx.conf file looks like this:
Press enter or click to view image in full size
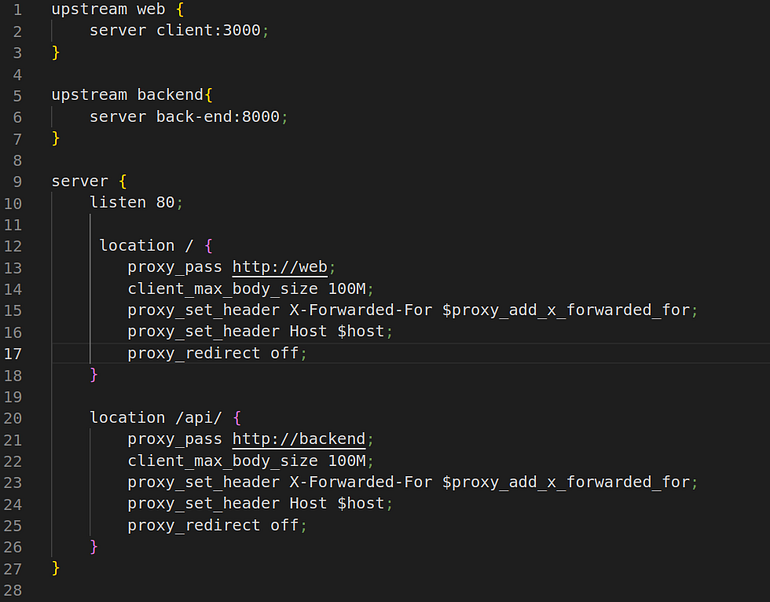
For the reverse proxy, set it to listen on port 80 (default port). Every path that matches /api/ will be forwarded to the backend. Any other paths will be sent to the web.
Hosting on Digital Ocean
Pre-requisite knowledge:
FileZilla
Using FileZilla to push your code to Digital Ocean
Press enter or click to view image in full size
To connect, enter:
The IP address of the droplet in the Host text field, as in the image above
root as the Username text field
Password is the droplet password that you will have to create
22 is the Port
Click on Quickconnect
Launch the droplet console. Then run the docker-compose command in the previous section:
docker-compose build && docker-compose up -d
You can paste the IP address of the droplet in the URL bar of your browser, and you will see the result.
(I have omitted the part where you should configure your domain, such as listcar.se; if you are interested, I can show that in the future).
Let’s encrypt the application.
Follow this excellent tutorial Digital Ocean provides for the Let's Encrypt certificate.
After the certificate is generated, copy the generated certificate to the reverse proxy folder of the droplet.
Change the docker file of the proxy to this:
Press enter or click to view image in full size
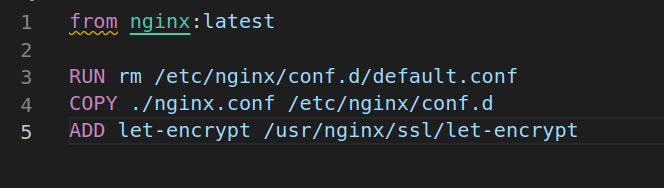
And change the content of the proxy Nginx to this:
upstream web {
    server client:3000;
}

upstream backend{
    server back-end:8000;
}

server {
    listen 80 default_server;

    server_name site_name;

    return 301 https://site_name$request_uri;
}

server{
    listen 443 ssl;

    server_name site_name;

    ssl_certificate   /etc/nginx/ssl/live/site_name/fullchain.pem;
    ssl_certificate_key /etc/nginx/ssl/live/site_name/privkey.pem;

    location / {
        proxy_pass http://web;
        client_max_body_size 100M;
        proxy_set_header X-Forwarded-For $proxy_add_x_forwarded_for;
        proxy_set_header Host $host;
        proxy_redirect off;
    }

    location /api/ {
        proxy_pass http://backend;
        client_max_body_size 100M;
        proxy_set_header X-Forwarded-For $proxy_add_x_forwarded_for;
        proxy_set_header Host $host;
        proxy_redirect off;
    }
}
The site_name is the domain. In my case, this is listcar.se.
If there are errors, please ensure your droplet firewall accepts incoming requests on port 80 and 443.
Thank you for reading. I hope this tutorial is beneficial. Let me know if there are any questions.